
This post is also available in: Français Deutsch
TwoTrees, better known for its 3D printers, also offers a fairly complete range of lasers, as many 3D printer manufacturers are increasingly moving into this market, complementary to 3D printing.
The TS3 is a bit different, as it is a laser machine with a built-in filtration system, as well as a motorised roller system for printing on cylindrical objects.
This is not the first laser I have tested, to tell the truth I was not a big fan until now, because I find these lasers relatively dangerous for the eyes, and also because when you engrave/cut wood with a laser there is always a risk of fire, it is imperative to stay next to the machine during an engraving. But could this TS3 change my mind?

Buy the TwoTrees TS3
Features of the TS3
- Enclosed housing with internal filter and/or exhaust
- Working area 300x200mm
- Laser power 10W
- Accuracy 0.1mm
- Machine weight 17kg
- LaserGRBL / Lightburn / Mobile app compatible
- Engraving via USB, micro-sd card or WiFi (mobile app)
- Engraves on wood (cuts up to 8mm), and many other materials (does not cut metal)
I’m not an expert on laser engraving, I’ve only used an Ortur M2 for a few hours, so forgive me if I’m talking nonsense, but I’ll share my opinion as a new user of this type of product.
Unpacking the TwoTrees TS3
It must be said that this machine is a big baby, relatively imposing, so it will have to be given some space, preferably next to a window for the exhaust pipe.
The advantage is that this machine is fully assembled, so it’s almost plug&play, you’ll have to take care to remove all the tape or clamps that hold the carriages in place during shipping.


First engraving with the TS3
A bit like with a 3D printer, to check that the laser is working properly, it is preferable to first engrave a test model, present as the micro-sd card. For example on a piece of cardboard supplied with the machine.
Here is the result, nothing crazy you will say, but at least we can see that the laser works, and we can start playing with it!

First engraving with the TwoTress TS3 laser
I first wanted to test the WiFi functionality, via the MKSLaser software available on the PlayStore, the ergonomics of the software is quite clear, even if it is in English, it is easy to understand how to use this application. This mode of operation is practical for simple and fast engraving, but for more complex engraving you will have to use a software installed on your PC/Mac.
Concerning WiFi, I thought I could also use this connection via another software like Lightburn, but it doesn’t seem to work, so it will be used mainly for the mobile version.


And here is the final result of this burning!
Oops… sorry in the rush I forgot to take a picture of the final result of this engraving, and since this one went to the trash! You can take my word for it, the result was really nice.

Using LightBurn with the TwoTrees TS3
To become a professional engraver, I strongly advise you to invest in the Lightburn software, it will cost you about 60 euros, but it’s worth it!
You can have a free 30 days demo version to try it before buying it, but be careful you might not be able to do without it 😉
I’m not going to give you a tutorial on LightBurn here, it would take a dedicated article, but one of the very interesting features with LightBurn is the “Laser Tools > Material Test” function, it will allow you to engrave a grid of small squares, with a different speed/power for each square, and thus be able to determine the result you will get with settings (you can also choose the number of passes).
Pictures to better illustrate this function! Don’t hesitate to use this function every time you use a new type of material (or other type of wood)


In this example I wanted to determine the power to make a clean cut, but you can also simulate a full engraving, to see what shade of black/grey you can get.
One last little capture about LightBurn, and then I’ll stop here!
LightBurn allows you to manage several layers (visible on the right), and you will be able to define layers which will be a simple engraving (low power, fast speed), and the lines to be cut (high power, slow speed, in several passes), you can put as many layers as you want!

Here is an example of an engraving obtained with outline cutting (note that the scale does not correspond to the LightBurn capture, nor the power). The wood used is 3mm, it is “Polywood” sheet that you can find on Amazon.


And there we start to have an interesting result, and imagine all the possibilities of this machine!
Here is a small slide show of my other wood tests


For some engravings I could notice a small effect “burned” on the outlines, especially on the back face, to attenuate these marks I made a test by using painter’s tape, to protect wood, and I noticed a significant improvement.
The tape was only put on the laser side, the final result is quite clean, on the last picture the bottom right corner was covered with tape, unlike the left side, you can clearly see the difference!
If I had wanted a clean surface on both sides I could have covered both sides.


Engraving on other materials!
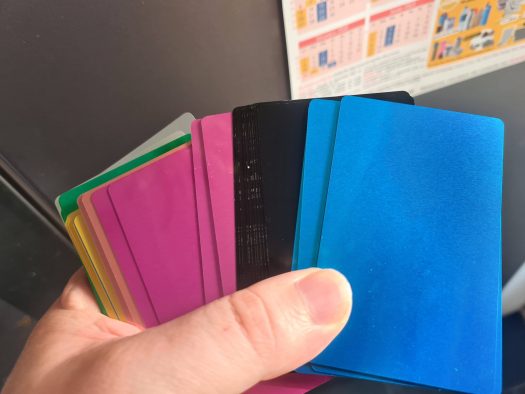
Another engraving test, this time on aluminium business cards covered with a layer of paint, you can find this type of card on Amazon. The result is really clean, so you can make very nice original business cards!

Another engraving on stainless steel, with the laser power turned up to the maximum, note that it is more of a marking than an engraving, there is no relief! I don’t know how this engraving will remain over time, the knife has been through the dishwasher several times since then, and so far it hasn’t moved.

Another experience with this TS3 laser, an engraving on (white) tiles covered with a layer of black paint. Super nice rendering, to make original gifts!
Note that you can also use this trick to apply several layers of paint of different colours, and then play with layers of different powers (or a greyscale image).

Finally, we’ll end on a failure, because I didn’t get a satisfactory result, but it requires more digging, an attempt to engrave on glass with the rotating roller system integrated to the machine. It is normally technically feasible, you can’t engrave directly on glass (the laser light will pass through), but by covering the surface with paint or tape (black maybe?) it is normally possible to engrave on glass…. so try again!


General opinion on the TwoTrees TS3
The TS3 is a great engraving experience, the enclosure system with the cover that protects from the laser is really a big plus. Thanks to the integrated filter system, and the exhaust pipe, you can avoid the big cloud of smoke around the machine, it’s very appreciable
It is always necessary to stay near the machine (never leave a laser machine unattended), even if this machine is equipped with a flame detector (and starts to ring and then pause, this has never happened to me yet)
This machine allows very nice realizations, if you have the creative spirit you will love this machine.
Buy the TwoTrees TS3


