
This post is also available in: Français Deutsch
Released in 2019, I was able to get the Ender5 Plus from Creality for testing, which I have now been using for almost 2 months, the opportunity to review this machine with which I had to do about 300 hours of printing during this period.
For those who don’t know Creality, it’s a Chinese company that manufactures 3D printers, they have extended their range in 2019 with many new products that I talked about in this article, among these new products we find the Ender 5 plus (see details on the official website), which is a 3D printer with a cubic format (it’s a Cartesian and not a CoreXY) with a large printing volume 350x350x400mm.

You may have already heard of the Ender 5, a 3D printer also in a cube format, but smaller, so this “plus” version is its big sister, with some very interesting “extra” options.
Details of the beast:
– Printing volume of 350x350x400mm (against 235x235x300mm for the Ender5)
– BL Touch autoleveling sensor (none on the Ender5)
– End of filament detector
– Touch screen
– Double motor for the Y axis
– Double threaded rod on the Z axis
– 550w power supply
– Ultrabase type plate (not glued)
For the complete sheet, go to the official website
The volume is more interesting than a classic CR-10 (300×300), so 5cm more can make the difference 🙂
This machine is sold to date 569$, or about 520€, victim of its success, it is unfortunately regularly out of stock.
We regret that it is not equipped with an original Silent Board, but Creality offers this upgrade as an option on their official website. The Ender5 plus will come with a Silent Board with TMC2208 for 55$, which is about 50€, the board will already be pre-flashed for the Ender5 plus.
So that’s it for the information on the machine, let’s go now to the unpacking of the product.

The box is quite large, as you can imagine, so you’ll need to allow for quite a bit of space. For my part, it will be installed on a 70cm deep ikea office table.
I placed a magnetic sticker for ender3/ender5 on the Ender5plus tray, so you can see the difference in tray size.
The machine is partially assembled, in 4 pieces, the instructions are quite clear, even if you are not a great handyman you should be able to do it easily.


For the curious, here is a picture of the inside of the beast.

It took me about 45min to assemble the machine, after checking all the eccentrics and the Z-offset, it’s now time to start the first print! I start with a model already present on the SD card, a “monkey pencil pot”, the rendering is relatively clean, satisfied with this first print.

For the 2nd print, I will launch a traditional Benchy, Creality recommends to use their Slicer, available on the SD card, after having installed it and made the tour, I finally preferred to use Cura, with a profile for CR-10 (the Ender5 plus was not present in the list of machines available under Cura). The rendering is also satisfactory.
UPDATE: after a few weeks of testing with Cura/S3D, I finally switched to Prusa Slicer 2, which now offers a basic profile for Ender3, which I used by just changing the tray size, the print output is really clean.

So now it’s time to make some big prints 😉With
this tray size you’ll have plenty to enjoy.
First big print, a full size helmet of the Mandalorian, what a pleasure to be able to make this kind of print in 1 time without cutting!
I had a little mistake on some of the supports, I wanted to reduce the printing time as much as possible, and I had underestimated the need for support on some points, the lower part of the helmet is really clean, but I started to have “blobs” (or drops in french) for the layer changes, because I had left the seam in random, I would have done better to choose a fixed area, too bad for these small defects, but this print is still relatively clean.
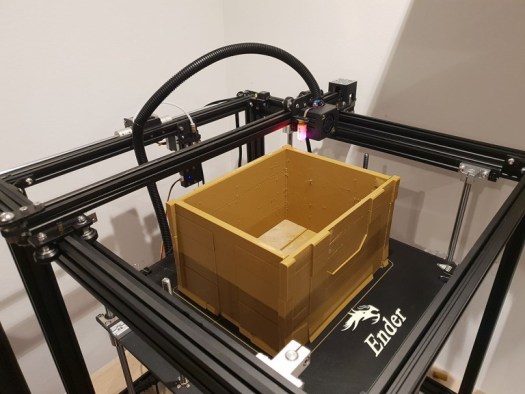
2nd big print, a fortnite chest in several parts, the 2 main blocks were made on the Ender5plus with Coffee filament from Sunlu, the other parts in Silver on another printer, printed with a layer height of 0,20mm. More than 100 hours in total for this print!

And for the 3rd big print, an XXL benchy! 500g of Sunlu Rainbow filament with a layer height of 0.30mm. So if you think that this print is totally useless and that it is a waste of filament, I reassure you, my son loves this print and plays with it in his bath (and no, he doesn’t float unfortunately!)

As a bonus, a photo of the “first layer” of the support part for one of the fortnite chest pieces, it’s really very clean, the BL Touch is really appreciable on this machine!

In conclusion, this machine is suitable for beginners as it is easy to assemble, and works without any modification, its printing volume is really interesting if you plan to print very large parts.
The original BL Touch is a plus, but it is a pity that there is no silent board. It is a machine that I recommend without any worries, you can buy it with your eyes closed. It will be necessary to foresee enough space, because very imposing, the support of coil of origin at the back (if one follows the note) is not very easy of access, one can undoubtedly put the coil differently, I did not try yet.
If you are interested in this machine, I would recommend the official website, because some retailers like banggood do not always respect delivery times and you will not get the manufacturer’s warranty directly from Creality.


